A meat grinder blade should be replaced when it shows signs of dullness or damage, typically every 6-12 months for home users, or every 1-2 weeks for heavy commercial use. Key indicators include reduced grinding efficiency, visible nicks or rounded edges, and increased motor strain. Replacing the blade ensures consistent meat texture, prevents motor damage, and maintains food safety by avoiding partially cooked fat from overheating.
Understanding Your Meat Grinder Blade: Anatomy and Function
At the heart of every meat grinder lies its blade, a critical component responsible for transforming cuts of meat into various textures of ground product. Typically crafted from stainless steel or carbon steel, these blades work in tandem with a grinding plate, acting like a pair of scissors to cleanly cut meat as it’s pushed through. The precise interaction between the rotating blade and the stationary plate ensures a uniform grind.
However, with each use, especially when processing tougher meats, the blade’s sharp edges gradually dull. This dulling process is inevitable due to friction and contact with meat, sinew, and even small bone fragments. A dull blade doesn’t cut; it smears and crushes the meat, leading to subpar results and putting undue stress on the entire grinding mechanism. Recognizing this degradation is the first step towards ensuring consistent performance.
Key Indicators: Signs It’s Time to Replace Your Meat Grinder Blade
Spotting the signs of a dull or worn meat grinder blade early can save you time, effort, and potential damage to your appliance. Here are the crucial indicators that your blade might be ready for replacement:
Reduced Grinding Efficiency
One of the most immediate and noticeable signs is a significant slowdown in your grinder’s performance. If you find yourself needing to apply more pressure to push meat through, or if the grinding process takes considerably longer than usual for the same quantity, your blades are likely losing their edge. Instead of slicing, they are struggling, causing the meat to build up and impede the flow.
Visible Damage and Wear
A visual inspection can often reveal much about your blade’s condition. Look closely at the cutting edges for any chips, nicks, or bends. If the edges appear rounded, shiny, or show signs of pitting, rust, or corrosion, they are no longer capable of providing a clean cut. Any physical damage means immediate replacement, as broken fragments could contaminate your food and pose a safety hazard.
Increased Strain on the Motor
A dull blade forces your meat grinder’s motor to work harder, leading to noticeable changes in operation. You might hear the motor straining, producing unusual grinding sounds, or experiencing increased vibration. Additionally, excessive friction from a dull blade can cause the meat, and even the grinder itself, to heat up more than usual. This not only compromises the quality and safety of your meat by partially cooking fat but also risks overheating and damaging the motor itself.
“A sharp blade is paramount for both food safety and equipment longevity. When your grinder starts sounding like it’s fighting the meat, it’s a clear cry for a new blade.” – Chef Antoine Dubois, Culinary Equipment Specialist
Factors Influencing Blade Replacement Frequency
The lifespan of your meat grinder blade isn’t fixed; it’s a dynamic equation influenced by several key factors. Understanding these can help you anticipate when a replacement might be necessary.
Frequency of Use
|
Our Picks for the Best Meat Grinder in 2026
As an Amazon Associate I earn from qualifying purchases.
|
||
| Num | Product | Action |
|---|---|---|
| 1 | CHEFFANO Meat Grinder, 2600W Max Stainless Steel Meat Grinder Electric, ETL Approved Heavy Duty Meat Mincer Machine with 2 Blades, 3 Plates, Sausage Stuffer Tube & Kubbe Kit for Home Kitchen Use |

|
| 2 | Cuisinart Electric Meat Grinder, Stainless Steel |
|
| 3 | Meat Grinder, Electric Meat Grinder with Sausage Stuffer Maker & Kubbe Kit, Metal-Body Meat Mincer with 3 Stainless Steel Grinding Plates & 2 Blades for Home Kitchen Using |
|
| 4 | AAOBOSI Multifunctional Digital Meat Grinder Electric 3000W Max w/ 9 Touch Screen Presets, Auto-Reverse & Built-in Storage -Grinding, Sausage & Kibbe & Grate Cheese Making for Home Use |
|
| 5 | AAOBOSI #12 Meat Grinder, [3000W] 3 Speed Meat Grinder Heavy Duty: Built-in Storage Box, 2 Blades,4 Plates,3 Sausage Stuffers,Kibbe Kit,Meat Claw & Burger Press, for Home & Kitchen Use |
|
| 6 | Weston Electric Meat Grinder & Sausage Stuffer, #12 750 Watt, 1 HP Motor, Grinds 4 lbs Per Minute, Includes Stainless Steel Grinding Plates, Die-Cast Aluminum (33-1301-W) |
|
| 7 | Camic Electric Meat Grinder - 300W Sausage Stuffer for Home Kitchen Use Meat Mincer with Stainless Steel 3 Plates, 1 Blade, Sausage Tube, Kubbe Maker |
|
| 8 | AAOBOSI Meat Grinder Electric 3000W Max with Touch Color Screen, Auto-Reverse & Built-in Storage - 3 Speed Settings,Grinding, Sausage & Kibbe Making for Home Use, Stainless Steel |
|
| 9 | VEVOR Commercial Electric Meat Grinder, 5 lbs/min Capacity, #8 Industrial Meat Mincer with 2 Stainless Steel Blades, 2 Grinding Plates, 600W Heavy-Duty Sausage Maker Stuffer, for Kitchen, Restaurant |
|
| 10 | Electric Meat Grinder, Sausage Stuffer with 3 Sausage Tubes, 2 Blades, 3 Plates, 3200W Max, Meat Grinder Heavy Duty for Home Kitchen Use, Stainless Steel (Black) |
|
Naturally, how often you use your meat grinder plays a significant role. For commercial kitchens and butcher shops that operate daily, blade replacement or sharpening might be needed every 1-2 weeks due to continuous heavy use. Moderate commercial use, a few times a week, typically requires attention every 1-2 months. For home users who grind occasionally or seasonally, checking the blade after every few uses and replacing it every 3-6 months is a good guideline. However, consistent inspection is always the best practice.
Type of Meat Processed
The kind of meat you frequently grind can also impact blade longevity. Processing leaner muscle meat is generally less demanding than grinding meat with significant amounts of gristle, connective tissue, or even small bone fragments. These tougher elements accelerate the dulling process. Grinding frozen or semi-frozen meat can also be harder on blades than grinding fresh, chilled meat, as the increased density requires more cutting force.
Blade Material and Quality
The material of your blade matters. Stainless steel blades are popular for their rust resistance and durability, making them a low-maintenance choice for many home users. Carbon steel blades, while capable of achieving a sharper edge, are more prone to rust and require meticulous drying and care after each use. High-quality blades, regardless of material, are often made with better manufacturing precision and harder alloys, which can maintain their edge for longer periods.
Maintenance and Care
Proper cleaning and maintenance habits can dramatically extend the life of your meat grinder blade. Neglecting to thoroughly clean and dry your blade after each use can lead to rust and corrosion, prematurely dulling the edge and compromising hygiene. Regular inspection and appropriate storage also play a crucial role in preserving the blade’s sharpness.
How Often Should You Replace Your Meat Grinder Blade? General Guidelines
While the exact timing for blade replacement varies, general recommendations can guide you. For professional settings with heavy daily use, blades often require replacement every 1-2 weeks, or at least sharpening every 1-2 months, to maintain peak efficiency. For the avid home cook who uses their grinder a few times a month, replacing the blade every 6-12 months is a reasonable estimate. Less frequent users might find their blades lasting 1-2 years.
It’s important to stress that these are merely guidelines. The ultimate determinant should be the performance of your grinder and the physical condition of the blade. Always prioritize replacement when you notice the tell-tale signs of dullness or damage, regardless of how recently you last changed it. A proactive approach ensures better results and a safer grinding experience.
The Replacement Process: A Step-by-Step Guide
Replacing your meat grinder blade is a straightforward task, but it requires careful attention to detail for safety and proper function.
Safety First
Before you begin any disassembly or handling of the blade, always ensure your meat grinder is unplugged from the power outlet. Meat grinder blades are exceptionally sharp, and accidents can happen quickly if the machine is accidentally activated.
Disassembly
Start by disassembling the grinder head. Typically, this involves unscrewing a large locking ring at the front of the grinder. Once loosened, you can remove the grinding plate, followed by the old blade. The auger (worm gear) might also come out at this stage, depending on your grinder model.
Installing the New Blade
Carefully place the new meat grinder knife onto the square shaft of the auger. It’s crucial to ensure the blade sits flush against the auger’s end. The sharp cutting edges of the blade must face outwards, towards where the grinding plate will be positioned. Incorrect orientation will result in smearing rather than cutting.
Reassembly and Testing
Once the new blade is in place, position the grinding plate over the blade, ensuring its notches align with the corresponding slots in the grinder head. Then, secure the locking ring tightly. After reassembly, manually check that all parts feel snug and correctly aligned. Before grinding meat, you might run a small, easily disposable piece of bread or vegetable through the grinder to ensure everything is functioning smoothly.
Extending the Life of Your Meat Grinder Blade
While replacement is eventually necessary, proactive maintenance can significantly prolong the effective life of your meat grinder blade and plate.
Proper Cleaning Techniques
Immediately after each use, disassemble the grinder head and thoroughly clean the blade and plate. Wash them with warm, soapy water, using a brush if necessary, to remove all meat residues and fat. Avoiding harsh abrasive cleaners or scouring pads, which can scratch the surface and promote corrosion. Prompt cleaning prevents food particles from drying and adhering, which can lead to bacterial growth and make future cleaning more difficult.
Drying and Storage
This step is often overlooked but is paramount for carbon steel blades and important even for stainless steel. After washing, completely dry the blade and plate using a clean cloth or paper towel. Any residual moisture, especially with carbon steel, can lead to rust and corrosion, which rapidly dulls the cutting edge. Store the dried components in a dry, safe place. Some users even apply a thin layer of food-grade mineral oil to carbon steel blades before storage to create a protective barrier against moisture. Storing blades separately or in protective wraps can also prevent accidental nicks and damage to the edges.
Sharpening Your Blade
While frequent sharpening can eventually compromise the blade’s geometry, occasional sharpening can extend its life before a full replacement is needed. For minor dullness, some users opt for manual sharpening using a fine-grit whetstone or sharpening steel, maintaining the original bevel angle (often around 20 degrees). Alternatively, professional sharpening services can restore the edge without altering critical dimensions too much. However, be aware that repeated sharpening removes metal, and after 3-4 sharpening cycles, the blade’s ability to cut cleanly against the plate may be fundamentally compromised, making replacement the best option.
Choosing the Right Replacement Blade
Selecting the correct replacement blade is vital for ensuring compatibility and optimal grinding performance.
Compatibility with Your Grinder Model
The most critical factor is ensuring the replacement blade is compatible with your specific meat grinder model. Blades come in various sizes, often denoted by a number (e.g., #5, #8, #12). Always check your grinder’s manufacturer specifications or consult the instruction manual. Key measurements to confirm include the blade’s overall diameter, the size and shape of the center square hole where it fits onto the auger shaft, and its thickness. Some blades have specific tab configurations that must match your grinding plate.
Material Considerations
Consider the blade material based on your usage and maintenance preferences. Stainless steel blades offer excellent rust resistance and are generally easier to care for, making them a popular choice for most home users. Carbon steel blades can achieve a slightly sharper edge, preferred by some professionals, but they require meticulous drying and potentially oiling after each use to prevent rust.
Where to Buy
Reputable sources for replacement blades include the original manufacturer’s website or authorized dealers, ensuring genuine parts that precisely fit your model. Dedicated kitchen appliance stores, specialty butcher supply shops, and major online retailers are also good options. When purchasing online, pay close attention to product descriptions, compatibility lists, and customer reviews to confirm fit and quality.
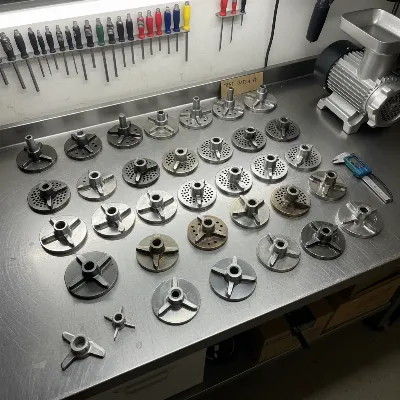 An assortment of various meat grinder blades and plates, showcasing different sizes and materials, neatly arranged on a workbench for comparison and selection. Bright, functional lighting.
Conclusion
A well-maintained and sharp meat grinder blade is the cornerstone of efficient and enjoyable meat processing. Regularly inspecting your blade for signs of dullness or damage, understanding the factors that influence its lifespan, and knowing when to replace it are all essential practices for any meat grinding enthusiast. While proper cleaning, drying, and occasional sharpening can extend your blade’s life, replacement remains inevitable and crucial for safety, consistent output, and the overall longevity of your appliance. By being proactive and choosing the right replacement, you ensure that your meat grinder continues to deliver perfectly ground meat, time after time.
How often do you inspect your meat grinder blade, and what’s the most common sign that tells you it’s time for a change?
Frequently Asked Questions
Can I sharpen my meat grinder blade?
Yes, you can sharpen meat grinder blades, especially for minor dullness. Methods include using a whetstone or professional services. However, excessive sharpening can alter the blade’s geometry, eventually making replacement necessary for optimal performance.
What happens if I don’t replace a dull blade?
Not replacing a dull blade can lead to smeared or mushy meat, longer grinding times, increased strain and potential damage to your grinder’s motor, and even overheating of the meat, compromising food safety and quality.
Are all meat grinder blades universal?
No, meat grinder blades are not universal. They come in various sizes and shapes, specific to different grinder models. It’s crucial to check your grinder’s specifications (e.g., blade diameter, center hole size) to ensure compatibility when purchasing a replacement.
How do I know if my blade is dull?
Common signs of a dull blade include slow grinding, meat coming out smeared or unevenly textured, increased motor noise or strain, and needing to push meat harder through the grinder. Visual inspection for nicks, chips, or a rounded edge also helps.
Should I replace the blade and plate together?
It is often recommended to replace the blade and grinding plate as a matched pair, especially in commercial settings. The blade and plate wear together, and a new blade paired with an old, uneven plate may not perform optimally, as they need to mate perfectly for a clean cut.
Frequently Asked Questions
Can a meat grinder blade be sharpened to extend its life?
Yes, meat grinder blades can be sharpened for minor dullness using a whetstone or professional services. However, after 3-4 sharpening cycles, the blade's geometry may be compromised, making replacement the best option for optimal performance.
What are the consequences of using a dull meat grinder blade?
Using a dull meat grinder blade leads to smeared or mushy meat, significantly longer grinding times, and increased strain on the motor, potentially causing damage. It can also overheat the meat, compromising food safety and quality.
Are replacement meat grinder blades interchangeable between models?
No, meat grinder blades are not universal. They vary in size and shape (e.g., #5, #8, #12) and are specific to different grinder models. Always check your grinder's manufacturer specifications, including blade diameter and center hole size, for compatibility.
How can I tell if my meat grinder blade is no longer sharp?
You can identify a dull meat grinder blade by several signs: slow grinding, meat appearing smeared or unevenly textured, increased motor noise or strain, and needing to apply more pressure to push meat through. A visual inspection may also reveal nicks, chips, or a rounded edge.
Is it necessary to replace both the blade and the grinding plate simultaneously?
It is often recommended to replace both the blade and the grinding plate as a matched pair, especially in commercial settings. The blade and plate wear together, and a new blade paired with an old, uneven plate may not perform optimally, as they need to mate perfectly for a clean cut.
Replace Your Meat Grinder Blade
Replacing your meat grinder blade is a simple process that ensures optimal performance and safety. Follow these steps to correctly install a new blade.
Always unplug your meat grinder from the power outlet before beginning any disassembly or handling of the blade. Meat grinder blades are exceptionally sharp, and accidental activation can cause serious injury.
Start by unscrewing the large locking ring located at the front of the grinder head. Once loosened, carefully remove the grinding plate, followed by the old blade. The auger (worm gear) may also come out at this stage, depending on your specific grinder model.
Carefully place the new meat grinder knife onto the square shaft of the auger, ensuring it sits flush against the auger's end. It is crucial that the sharp cutting edges of the blade face outwards, towards where the grinding plate will be positioned. Incorrect orientation will result in smearing rather than cutting.
Once the new blade is in place, position the grinding plate over the blade, making sure its notches align with the corresponding slots in the grinder head. Secure the locking ring tightly. After reassembly, manually check that all parts feel snug and correctly aligned. Before grinding meat, you might run a small, easily disposable piece of bread or vegetable through the grinder to ensure smooth operation.

I’ve been struggling with my grinder for a while, thinking it was just me. The part about visible nicks and rounded edges really hit home. My old blade was definitely showing those signs. Swapped it out and now my pork shoulder for sausage making is coming out perfectly. No more partially cooked fat getting stuck, which is a huge relief for food safety.
This was super helpful for understanding the anatomy of the blade. I always just thought it was a sharp piece of metal. Knowing it works like scissors with the grinding plate makes a lot of sense. I’m a home user and usually grind every few months, so the 6-12 month replacement guideline is perfect for me to keep in mind.
I appreciate the info on when to replace the blade. Mine was definitely showing signs of reduced grinding efficiency, especially with fattier cuts. I replaced it, and while it’s better, I still feel like my motor strains a bit more than it should. Maybe I waited too long and caused some wear, or perhaps I need to look into a different brand of blade next time.
I used to think my grinder was just getting old, but after reading about blade dullness, I checked mine. Sure enough, it was pretty rounded! Replaced it with a new stainless steel one and the difference is night and day. My venison grinds so much faster and smoother now, no more mushy bits. Definitely a game changer for consistent meat texture.